Sunday, January 22, 2012

Chicken Picatta Pasta Toss

I can't believe I've never posted this recipe. It's one of my first meals that I successfully cooked, and has become quite a popular dish requested by friends and family.

This recipe is based on Rachel Ray, but I hesitate to say that this truly takes a half hour to make. The cooking part - yes, but there is a lot of prep time involved. My suggestion is to prep all of the food before getting started to make this stress-free.


Chicken Picatta Pasta Toss


Source: Food Network.com
Prep time: 20 minutes
Cook time: 25 minutes

Ingredients
2 tablespoons extra-virgin olive oil
2 pounds chicken breast tenders, cut into 1-inch pieces
Salt and pepper
Adobo seasoning
1 1/2 tablespoons butter
8 cloves garlic, chopped
4 shallots, chopped
2 tablespoons all-purpose flour
1/2 cup white wine (substitution: Sparkling Apple Cider)
1 lemon, juiced, skin grated
1 cup chicken broth or stock (substitution: vegetable broth)
3 tablespoons capers, drained
1/2 cup flat-leaf parsley, chopped
1 pound penne rigate pasta, cooked to al dente

Directions
1. Heat a deep nonstick skillet over medium high heat. Add a tablespoon of extra-virgin olive oil and the chicken to the pan. Season chicken with salt and pepper and Adobo. Brown chicken until lightly golden all over, about 5 to 6 minutes.
2. Remove chicken from pan and return the skillet to the heat. Reduce heat to medium. 3. Add another tablespoon extra-virgin olive oil and 1 tablespoon butter, the garlic and shallots to the skillet. Saute garlic and shallots 3 minutes.
4. Add flour and cook 2 minutes. Whisk in wine or cider and reduce liquid 1 minute.
5. Whisk lemon juice and broth into sauce. Stir in capers and parsley.
6. When the liquid comes to a bubble (about 5-8 minutes later), add remaining 1/2 tablespoon butter to the sauce to give it a little shine.
7. Add chicken back to the pan and heat through, 1 to 2 minutes.
8. Toss hot pasta with chicken and sauce and serve. Adjust salt and pepper, to your taste.
Serves 4.

PS. Garlic bread works incredibly well with this dish! YUM!

Sunday, December 25, 2011

Holiday Cookies 2011, Part 2

Here's my holiday gift to you, my wonderful readers: Peanut Butter Blossom Cookies. I can't describe to you how much I love peanut butter, and of course chocolate! I've had these at holiday parties for years, and never realized how easy this was to make.

Also, I made these with traditional milk chocolate Hershey Kisses. However, there are some fun holiday versions - peppermint, white chocolate, candy cane flavored - these could easily be changed up!

Peanut Butter Blossoms (adapted from Bakergirl)
(makes about 32 cookies)

Ingredients:

1/2 cup butter, softened
1/2 cup granulated sugar
1/2 cup firmly packed brown sugar
1/4 cup creamy peanut butter
1 large egg
1 teaspoon vanilla extract
1 3/4 cups all-purpose flour
1 teaspoon baking soda
1/2 teaspoon salt
Hershey kisses
1/4 cup granulated sugar to roll cookies in

Instructions

1. Preheat oven to 350°F.

2. In a bowl with a mixer, beat butter, granulated sugar, brown sugar, and peanut butter. Then beat in egg and vanilla.

3. In another bowl, combine flour, baking soda, and salt. Add to the butter mixture and beat until well blended.

4. Shape dough into 3/4-inch balls and roll in 1/4 cup granulated sugar. Set ball 1 1/2-inches apart on a greased baking sheet.
5. Bake for 8 to 10 minutes, or until slightly darker brown.

6. Place 1 chocolate kiss into the center of each cookie; expect dough to crack. Return to oven and continue to bake until chocolate is shiny and soft, about three more minutes. Cool and then serve.

Holiday Cookies 2011, Part 1

I'll fully admit it - baking is not always my favorite thing. The exactness of the measurements, the mess I make in the kitchen, the fear of leaving the food in the oven for too long and burning - it gives me some serious anxiety!

Luckily, I've realized that practice makes perfect, especially when it comes to baking cookies. Below is my favorite holiday cookie I made as presents for friends and family. It was a great, personalized touch and I'm happy I made the effort to embrace baking more! Hopefully in 2012, you will see some sweeter options in the blog. In the meantime
, enjoy!

Mint M&M Cookies (adapted from Treasures from Brenda)
(makes about 40 cookies)

Ingredients

1 cup of soft butter (it is critical that it be soft)
1/2 cup sugar
1/2 cup packed l
ight brown sugar
1 large egg
1 tsp vanilla
2 cups regular all-purpose flour

1/2 tsp baking soda
1/8 tsp salt
9-ounce package of mint M&Ms (found at most supermarkets during the holidays)

Instructions

1. Preheat oven to 350 degrees. Grease cookie sheets
2. In a mixing bowl, cream together the butter and the sugars until light and fluffy.

3. Beat in the egg and the vanilla.
4. In another bowl, mix together flour, baking soda and salt. Add the dry ingredients to the wet ingredients and mix.
5. Stir in M&Ms
6. Using a small spoon,
drop cookies of about one heaping teaspoon onto your cookie sheets, making them about two inches apart.
7. Bake for 10 to 13 minutes (mine were perfectly cooked in 11 minutes). Be sure to remove before they become too brown - they can burn quickly!
8. Cool on cooling racks and then enjoy!

Sunday, November 20, 2011

A Taste of India

Many people tend to forget how unique the food is in each region of India. I've grown up in a traditional Gujarati household, which according to Wikipedia: "Is primarily a vegetarian cuisine, despite having an extensive coastline for sea food, due influence of Jain vegetarianism and traditional Hinduism.[1][2] The typical Gujarati Thali consists of Roti (a flat bread made from wheat flour, and called rotli in Gujarati), daal or kadhi, rice, and sabzi/shaak (a dish made up of different combinations of vegetables and spices, which may be stir fried, spicy or sweet)."

Seeing that I had daal with basmati rice and curried potatoes for lunch, some of that sounds right. :)

Below is a great map to give you the full Taste of India. Enjoy!


Sunday, August 28, 2011

Berry Trifle

It's the month of Ramadan, which always brings back a rush of happy memories with my family. If there's one thing we all love to do, it's EATING. So breaking fast together usually means having some special treats and loading up on some favorite foods. At a recent iftaari at the mosque, I decided to make a dessert that would not only look pretty, but would also be fresh and delicious. And, let's not lie - I was dying for an excuse to purchase a trifle bowl :)

This dish has so many layers of delicious flavors. I lucked out with the strawberries and blueberries - they were at the peak of season and were incredibly bright and sweet. The buttery pound cake lightly flavored with vanilla and almond extract was a great touch. I could easily see this being a huge hit at any summer BBQ. Enjoy!

Berry Trifle (adapted from Sunny Anderson's Recipe here)


Ingredients

1/4 cup plus 2/3 cup sugar
1/4 cup fresh lemon juice
1/4 teaspoon almond extract
1/4 teaspoon vanilla extract
1 pound cake, cut into 1-inch cubes
1 pound cream cheese, at room temperature
2 cups heavy cream, at room temperature
2 pints blueberries
2 pints strawberries, hulled and sliced

Directions


1. Heat 1/4 cup sugar, the lemon juice and 1/4 cup water in a saucepan over medium-high heat, stirring, until the sugar dissolves. Remove from the heat and stir in the almond and vanilla extracts. Dip the slices of pound cake on each side with the syrup. Cut the slices into 1-inch cubes.

2. Beat the remaining 2/3 cup sugar and the cream cheese with a mixer on medium speed until smooth and light. Add the cream and beat on medium-high speed until smooth and the consistency of whipped cream.

3. Arrange half of the cake cubes in the bottom of a 13-cup trifle dish. Sprinkle evenly with a layer of blueberries. Dollop half of the cream mixture over the blueberries and gently spread. Top with a layer of strawberries. Layer the remaining cake cubes on top of the strawberries, then sprinkle with more blueberries and top with the remaining cream mixture.

4. Finish with the remaining strawberries and blueberries, arranging them in a decorative pattern. Cover and refrigerate 1 hour.

Sunday, August 14, 2011

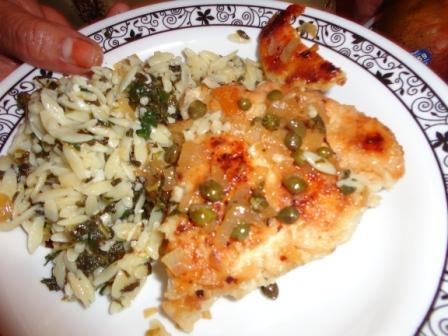
Chicken with Orzo, Spinach and Lemon

For me, there is a thrill that comes from cooking when I can open my pantry and my refrigerator and realize that I have the ingredients to make something truly delicious. Today's dinner was inspired by a box of orzo and some frozen spinach. Things started to get interesting when I realized I also had capers and chicken breasts. Bam! We have Chicken with Orzo, Spinach and Lemon, ladies and gentlemen.

I loosely based my meal on a recipe I found on Ciao Italia with Mary Anne Esposito, with some some slight changes. Enjoy!

Chicken with Orzo, Spinach and Lemon
Serves 4
30 minutes prep and cook time

Ingredients
1 1/2 cups orzo cooked according to package directions
1/2 cup extra virgin olive oil
One 10 ounce package frozen chopped spinach, thawed and well squeezed
4 skinless boneless chicken breast halves
1/4 cup flour
1/2 teaspoon fine sea salt
Grinding coarse black pepper
1/2 teaspoon red pepper flakes (optional - I like some heat!)
1/2 teaspoon garlic powder
2 tablespoons unsalted butter
2 tablespoons minced onion
2 tablespoons capers in salt, well rinsed and minced
1/2 cup white wine or sparkling apple cider
1/2 cup fresh lemon juice
2 tablespoons lemon zest
4 tablespoons fresh minced parsley (optional)
2/3 cup grated Parmigiano Reggiano cheese (I used mozzarella but would have preferred parmigiano)

Directions

1. Combine the orzo with 1/4 cup of the olive oil. Stir in 1/4 cup of the lemon juice. Salt to taste. Stir in the chopped spinach and 1/2 cup of cheese. Cover, set aside and keep warm. Or make ahead and reheat in the microwave when ready to serve.

2. Meanwhile, place each piece of chicken between two sheets of wax paper and use a meat pounder to thin them to about 1/4 inch thickness. Mix the flour, salt and pepper together in a bag and place each breast into the flour mixture, coating well on both sides and shaking off the excess. Set aside.

3. Heat the remaining olive oil in a large non stick skillet and brown the chicken, adding more olive oil as needed. Transfer them to a dish as they brown, and set aside. However, do not stack the breasts on top of each other, as they get soggy.

4. Add the butter to the pan and stir in the onion; cook until the onion wilts down, about 3 minutes. Add the capers and cook 1 minute. Stir in the wine or cider, raise the heat to high and cook 3 minutes, stirring frequently. Stir in lemon juice and zest and cook over medium heat until the sauce thickens slightly.

5. Return the chicken cutlets to the pan and heat gently until hot. Make a bed of the orzo mixture on a serving platter. Place the chicken breasts over the orzoand pour the sauce over the top. Sprinkle on the remaining cheese and parsley, and serve.